
Here are the tools of BOgear. Some are to be expected, while others might surprise you!
The cutting tools:

A 4 inch rotary cutter. Like a pizza cutter on steroids. This thing is awesome. Can cut anywhere up to 10-15 layers of fabric at any one time. Also does an awesome job cutting just a single layer of fabric. A hell of a lot better than a standard pair of scissors / hand shears.

An 8 inch straight blade cutter. Kind of like a woodworkers jigsaw cutter, only it has a smooth serration free blade. The blade pumps up and down and slices the fabric like a saw.

This beast is loud, and can cut up to 8 inches of stacked fabric. It really sucks for small stacks of fabric. This is mostly due to the pumping up and down action of the blade. Small stacks aren't as solid and shift, causing the blade to "punch" rather than slice, creating a really frayed cut.
Unfortunately I haven't had a real opportunity to use this beast to its full capacity... I just pull it out now and then to impress visitors.. :)
We also have a few scissors and shears floating around the studio, but these are not used anywhere near as often as the 4 inch rotary cutter...

Another neat little cutting device are these thread snips. They are a miniature pair of scissors, with a spring loaded self opening blade. Useful for trimming all the products that come out of our studio. Also very helpful for quickly ripping open seams...
The random tools:
We usually have a few random tools floating around that people do not associate with sewing production. Unfortunately these are the only ones I could find and think of at the time.

A hammer and self-retracting tape measure. More suited for a woodworking shop than a sewing studio, but rest assured these puppies get used fairly often!
The hammer is particularly useful for teaching thick seams how to become thin! As our machines can only handle a certain fabric thickness, sometimes multiple folds and pieces of fabric stuck together pushes this limit. The hammer is used to squish the fabric to a more manageable proportion.
The tape measure on the other hand is fantastic for quickly measuring lengths of fabric or webbing. As it is stiff it requires less effort, and as it is self retracting makes it much quicker to put away neatly (which is a bonus in our studio as it often gets quite messy!)
The machines:
The BOstudio is filled with four dedicated industrial machines, with a fifth soon to arrive. Industrial machines are built tough, and designed to do one task only. But it does this one task very, very well. Home machines on the other hand are not built to last (they have plastic internal gears which break) but on the other hand can do multiple types of stitches. For a production studio, a home machine will not cut the mustard...

This is a Singer 491. It is a standard straight stitch sewing machine. This particular machine was bought to do the edge binding on our bags (the black tape that runs around the seams on our bags). Unfortunately it couldn't keep up with the task, so we have switched it over to be a straight stitch machine. It is also for sale... know anyone who is keen? It has hardly been used in our studio and is just taking up space...

This is a Brother B791. It is a needle feed straight stitch sewing machine. It also happens to be our first machine! A needle feed machine is very similar to a standard machine, except the needle is plunged into the fabric when it is pulled backwards. This way two layers of fabric will not slip apart from each other as they are physically held together!
This particular machine is more suited to light weight work so doesn't see much action any more. But I am rather partial to the machine so don't want to sell it.

The foot on the needle feed machine looks exactly the same as a regular home sewing machine. This particular set up however uses a Teflon foot. Teflon feet are fantastic for "sticky" work such as sewing rubber or PVC. As a regular metal foot is always in contact with the fabric, it creates drag. Teflon feet are friction free, thus reducing drag and giving a much neater sew.

A Toyota AD320. This is the workhorse of our studio. It touches every single bag we sew.
This particular machine is a compound machine. It is both a walking foot and a needle feed machine. Like the Brother above, the needle is plunged into the work when it is pulled backwards. In addition to this, the foot clamps the work ensuring individual layers do not slip and slide.

This is what a walking foot looks like up close. The foot consists of three feet, with the middle one clamping while the needle is plunged. This foot also moves forwards and backwards when the work is pulled. The outer feet alternate motion to the inside foot. So when the inside foot is down, the outside feet are up. Because of this it gives the impression that the feet are walking, hence its name.
This particular machine is amazing. It has serious grunt and can punch through anything that you can fit under the foot (up to 12mm of work!). It often comfortably goes through 3 - 4 layers of webbing, along with 2 layers of PVC and 2 - 4 layers of nylon!

The machine also uses a "servo" motor. This particular motor only turns on when the pedal is pressed, which not only uses less electricity but also makes the studio much more quiet! Servo motors are also speed variable which means it accelerates according to the pressure on the pedal. Rather like a car. Standard "clutch" motors don't have this, and only have two settings... on or off. And when on, sew insanely fast...
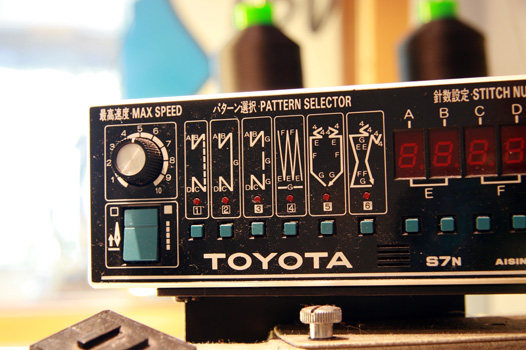
On top of the machine is what I like to call the "set top box". Unfortunately it doesn't pick up Digital TV, but it does allow you to control your stitches. For example if you have multiple pieces of work that only require a triple tack, you can set the machine up to do it. For repetitious tasks, this is a godsend!

This is our final machine, which is a Consew 227 RFS. It is very different to all our other machines, and is set up as a dedicated binder. It is the ducks nuts of binding machines. It is a cylinder arm, compound feed including the binding arm.
Translation:
Binding machine: This machine stitches the black tape around all the edges of fabric on our bags. It feeds the tape directly off the spool, before folding it in half (perfectly!) and then wrapping it around the seam and finally stitching it down.
Cylinder arm: the machine is mounted higher off the bench, so work can be passed around and underneath the area being sewn if wished. Standard machines are "bench mounted" which means you cannot pass any material under the area being sewn (unless you want to pass it under the table, which is massive).
Compound feed: Like our Toyota, this machine is a walking foot and needle feed machine. A big bonus for heavy and thick work.
Including the binding arm: The binding arm moves forward and backward, keeping an even gap between the walking foot. What this means is it not only self pulls the binding tape off the spool, but also allows you to bind tighter radiuses with quality results.

And a close up of the cylinder arm, binding bar and walking foot. You can see the foot is quite close to the binding bar, yet it never touches as the binding bar moves forwards and backwards in time with the foot! You can also see how the tape is folded before being sewn.
And so there you have the most obvious tools in our studio. I would have liked to put up a picture of Gypsy, but figured that would be work place harassment...
Stay tuned for more behind the scenes look at the BOgear studio...

love the pics and info dave, really like the 'behind the scene' sort of things you share, its really informative. and I already know what gyp looks like... :P
ReplyDeleteGreat post!
ReplyDeleteI geek-out very easily over tools, and having worked a little with an industrial machine I have great respect for them, thanks for the insight.